Zoho Webhooks are a tool you can use for sending data between third-party and first-party applications without the use of tools like Zapier. Webhooks are sometimes called “reverse APIs” because they allow users to trigger events based on changes to the website’s data. Instead of taking data from users and creating a response, the data on the remote server generates the message. It’s a “push” architecture compared to a “pull” architecture, so it’s far more efficient.
For example, instead of constantly asking Gmail if you have new mail every second, you can just ask Gmail to notify you when new mail arrives. Lower server load, less traffic, happier users. Often, the data is identical to what you’d get using the API: it’s just “pushed” to you when available, instead of “pulled” down at your request. With webhooks and APIs, you can essentially write your own connectors between any two API-offering vendors.
What’s an API, Anyway?
If you’re not sure what an API (Application Programming Interface) does, think of it as a website, but for blind robots. There are no pictures, no colors, no graphics, and no layout. Instead, it’s pure data – and bots love that stuff.
The countless servers that make up the internet sling the raw data back and forth to one another in a machine-readable format. This way, each recipient can process the data for their own purpose, with minimum complexity. It even uses the same basic communication process as a website, working with over-familiar HTTP. If that’s a little foggy, this video might help clear things up.
How do APIs talk?
APIs communicate in JSON or XML. Don’t let the abbreviations fool you: these are just different formatting rules for creating a machine-readable list of attributes for various objects. Basically, the format ensures both the sender and the recipient are parsing the data correctly. JSON is more common in general, but Zoho typically prefers XML. For our purposes, there is little practical difference between the two formats.
For example, a JSON (JavaScript Object Notation, for those keeping scores at home) reply containing a weather forecast might look something like this:
{
    "forecast": {
        "todayWeather": {
            "icon": "icons/cloud.svg",
            "description": "Cloudy with a chance of rain this afternoon.",
            "temp": 78,
            "precipitation": 40,
            "dewpoint": 62
        },
        "tomorrowWeather": {
            "icon": "icons/sun.svg",
            "description": "Mostly sunny with scattered clouds.",
            "temp": 87,
            "precipitation": 10,
            "dewpoint": 55
        }
    }
}
If you ignore the markup, it’s essentially a list of parameters, sometimes called keys and their specific value. These combinations of keys and values are often referred to as “key/value pairs.”

This data is often transmitted directly in the URL. If you’ve ever wondered about all the junk after the ? in your URLs, well, those are probably API keypairs!
What are APIs used for?
APIs are used everywhere online, but they’re not directly visible to the end user.
Next time you use Google, Amazon, Netflix, or Dropbox, take a look at the absolutely enormous URLs you generate as you browse. In most cases, everything after the ? are API parameters. You can even parse the keys and values by looking for equal signs. Of course, you’ll likely have a hard time understanding them, since the data is coded in alphanumeric strings. Each parameter enables different options and sends different data, from pulling up product listings or tracking referring webpages. If you’ve worked in web marketing, you’ve seen these communication codes in Google Analytics’ UTM parameters.
Third-Party Communications
The interoperability of webhooks with third-party services can be variable. It’s essentially up to the third party to offer a functional API if they so desire. Some services, like GitHub and Discord, have done the work to make interoperation easier. Others have not, and you might be required to write a “translator” that parses from one format to another.
In fact, that translation layer is at the core of app-connector services like IFTTT and Zapier. They translate between the various request formats for many different services, producing mutually intelligible requests for any pair of services they support. Fortunately, when communicating between Zoho apps, you won’t need to worry about third-party problems.
Creating Webhooks With Zoho CRM
Think of Zoho webhooks as little notes you can pass from one application to another. The receiving app reads the note and takes action based on its contents. In this metaphor, the note is the webhook’s message. The recipient is the other application, which extracts the fields included in the URL and plugs them into the appropriate places, taking the specified actions based on your setup.
Creating a webhook
- In Zoho CRM, navigate to Setup > Automation > Actions and select Webhooks.
- On the resulting Webhooks page, click Configure Webhook.
Setting webhook parameters
On the New Webhook page, you’ll be able to specify the necessary parameters of the webhook.
- Name: the name the webhook will be saved under.
- Description: an optional description of the webhook’s function.
- URLs to Notify: the destination of the webhook.
- Method: POST sends data out, GET requests data in. For our example, we will use POST to send a message to another application.
- Module: The data module you want the webhook to be active for. This will vary based on the purpose of your webhook.
- URL Parameters: Here is where the magic happens.
- Append Entity Parameters: Now, we decide what’s going to be in our message. Under Parameters in the User Defined Format, select the fields you’d like to send in your webhook.
- Append Custom Parameters: Use these fields to append arbitrary key/value pairs to your webhook. This is most useful for API keys or other configuration or authorization values.
- Preview URL: your URL will be populated with the parameters you’ve added. Click Refresh Now to rebuild the URL with new changes.
Firing a webhook
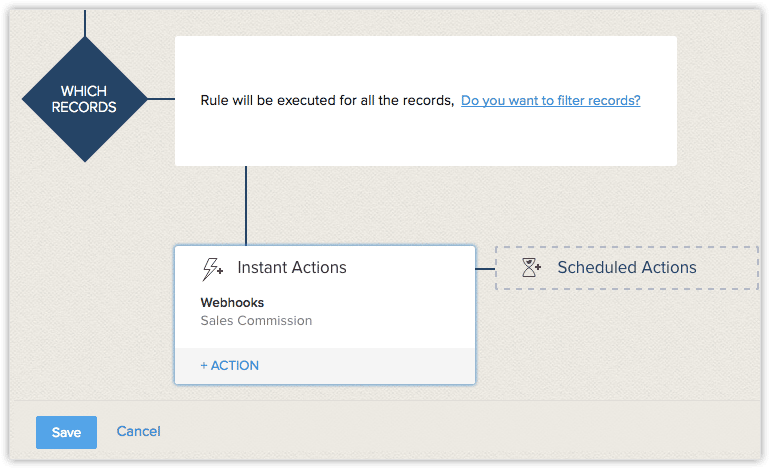
Once you’ve got the webhook configured, you’ll need to set up a workflow that actually triggers the webhook. Without this kick in the pants, the webhook won’t do anything.

- Navigate to Setup > Automation > Workflow Rules
- Click the Create Rule.
- Specify workflow rule parameters.
- Workflow Actions, select webhooks.
- In the Call Webhook popup, select the required webhook and click Associate.
- Click Save.
Conclusion
Now that you have an understanding of how webhooks go together, you can start exploring them with your own data. If you’re slightly paralyzed by the sheer number of possibilities, take a look at Zoho’s documentation and webhook examples for inspiration. You can learn more about how webhooks and APIs work. Or as always feel free to drop us a line at Zenatta!


